Nail art has evolved into a vibrant form of self-expression, allowing individuals to showcase their creativity and personality right at their fingertips. Among the myriad of styles and designs, mixing and matching different nail art techniques and colors has gained significant popularity. The eclectic approach not only adds fun to your manicures but also allows for endless originality and flair. In this extensive guide, we will explore the exciting world of mix and match nail art, featuring trendy combinations, techniques, and tips to inspire your next nail adventure.
The Allure of Mixing and Matching Nail Art
The appeal of mix and match nail art lies in its playful nature and the ability to create something uniquely personal. Here are several reasons why this style is so captivating:
1. Endless Creativity
Mixing and matching techniques and colors enables boundless creativity. You can combine different styles, such as stripes, dots, and even textured designs, without worrying about adhering to a specific set of rules.
2. Personal Expression
Nail art is a reflection of your individuality. By layering various designs and colors, you can highlight different facets of your personality, mood, or even seasonal trends.
3. Trendy Yet Timeless
Eclectic nail art can easily incorporate current trends while remaining classic and stylish. This balance means your manicures will always feel fresh and relevant, regardless of changing fashion.
4. Fun and Playful Aesthetic
The mix and match approach encourages a sense of fun. Experimentation is encouraged, which can lead to whimsical designs that make your nails a conversation starting point.
5. Unique Combinations
Every mix and match set is unique, making it impossible to replicate exactly. This uniqueness guarantees your nails will always stand out in a crowd.
Essential Tools and Products for Mix and Match Nail Art

Before diving into the world of funky nail art combos, it's important to have the right tools and products. Here’s a list of essentials you will need:
Tools
Nail Polish: Acquire a wide array of nail polishes in various colors and finishes. Consider classic shades, neons, pastels, and even glittery or metallic options for versatility.
Base Coat: A good quality base coat is essential for protecting your natural nails and allowing polish to adhere more effectively.
Top Coat: A top coat not only adds shine but also protects your designs from chipping and fading.
Nail Art Brushes: A variety of nail art brushes, including fine tipped and wider brushes, allow for detailed designs and clean application.
Dotting Tools: Dotting tools in various sizes are perfect for creating dots and intricate patterns.
Striping Tape: This thin tape is useful for making straight lines and geometric designs.
Sponge Applicators: Sponges come in handy for gradient effects and blending colors seamlessly.
Nail Stickers or Decals: Incorporating stickers or decals provides an easy way to achieve intricate designs without elaborate techniques.
Nail Files and Buffers: Keep your nails shaped and smooth for a polished finish.
Cotton Pads and Nail Polish Remover: These are essential for cleanup and fixing mistakes during your nail art process.
Preparing Your Nails for Art
Preparing your nails properly is crucial for achieving stunning results with your mix and match designs. Follow these steps before starting:
1. Clean Your Nails
Begin by washing your hands thoroughly and removing any previous nail polish. Clean nails are vital for good adhesion.
2. Shape Your Nails
Using a nail clipper and file, shape your nails according to your preference. Popular shapes include square, oval, and almond.
3. Push Back Cuticles
Gently push back your cuticles using a cuticle pusher or an orangewood stick. This step creates a clean edge and allows for better polish application.
4. Buff Your Nails
Lightly buff the surface of your nails to create a smooth canvas, which helps with the polish application and finish.
5. Apply a Base Coat
Finish your prep with a thin layer of base coat to protect your natural nails. Allow it to dry completely before moving on to your nail art.
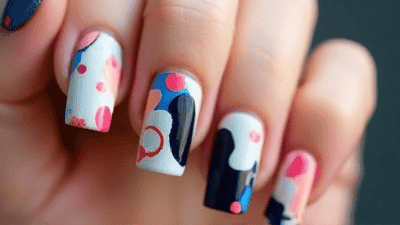
Fun and Eclectic Nail Art Combo Ideas

Now that you're fully prepped, let’s explore some creative combinations that you can mix and match to achieve eye-catching nail designs. Here are several fun and eclectic nail art ideas to inspire you:
1. Stripes and Dots
Combine horizontal stripes with polka dots for a playful look.
How to Do It
- Paint your nails with a base color.
- Use striping tape to create stripes on half of your nails.
- Paint over the exposed area with a contrasting color.
- Once removed and dried, use a dotting tool to create dots on the other half.
- Seal with a top coat.
2. Floral and Geometric
Mix delicate florals with bold geometric shapes for a stunning effect.
How to Do It
- Apply a solid color as a base on all nails.
- On a couple of nails, use a fine brush to create small flowers with multiple shades, focusing on petals and centers.
- On the other nails, use striping tape to create geometric shapes, filling in with a contrasting color.
- Finish with a glossy top coat.
3. Gradient and Glitter
Create a dazzling gradient and top it off with glitter for extra sparkle.
How to Do It
- Using a makeup sponge, dab two complementary colors to create a gradient effect, blending from the base to the tip.
- Allow it to dry for a couple of minutes.
- Apply a layer of fine glitter on top of the gradient to add dimension.
- Seal with a top coat for a polished finish.
4. Neglected Space and Metallics
Leave some negative space on your nails and combine it with bold metallic hues for a sleek look.
How to Do It
- Paint certain sections of your nails with a bright color, leaving a section unpainted (this is your negative space).
- Once dry, use metallic polish or nail foil to add accents or stripes across the negative space and colored sections.
- Finish with a top coat to blend and enhance the design.
5. Playful Animal Prints
Experiment with different animal prints on alternating nails for a fun twist.
How to Do It
- Apply a base coat and allow it to dry.
- On some nails, create leopard print using a base color and contrast dots and oval shapes.
- On other nails, create zebra stripes with a glossy black polish on a light background.
- Use a top coat to seal the designs.
6. Textured Designs with Metallic Accents
Combine textured designs with metallic polish to create a rich and varied look.
How to Do It
- Use a textured polish (like a sand effect or matte) on some nails.
- On others, paint with metallic colors, like gold or silver, and use a fine brush to add unique shapes or lines.
- Top with a clear coat to give a finished touch and add shine.
7. Color Blocking and Abstract Patterns
Try mixing bold color-blocking techniques with abstract designs for a modern vibe.
How to Do It
- Use striping tape to create blocks of color on your nails.
- After removing the tape, use a fine brush to create abstract lines or shapes in contrasting colors within or around the blocks.
- Finish with a top coat.
8. Cosmic Effects
Bring the galaxy to your nails by blending deep blues and purples with stars and planets.
How to Do It
- Use a sponge to apply dark blue and purple polish to your nails, creating a gradient effect.
- Add splatters of white polish to represent stars using a toothbrush or splatter brush.
- Optionally, use a small dotting tool to create planet shapes and detailed stars.
- Seal with a top coat for a shiny finish.
9. Seasonal Inspiration
Let the seasons inspire your designs. Use fall colors and leaves in the autumn, pastels and florals in spring, and jewel tones in winter.
How to Do It
- Paint your nails with a seasonal color palette (like oranges and browns for autumn).
- Use nail art brushes or dotting tools to create seasonal motifs such as leaves, flowers, snowflakes, or summer fruits.
- Seal everything with a top coat.
10. Monochrome Madness
Opt for various shades of the same color for an elegant monochrome look.
How to Do It
- Choose a color (like blue) and select various shades in that range from light to dark.
- Paint some nails with a medium shade, others with lighter shades, and mix in a few dark shades.
- Use stamping or dotting to add intricate patterns that maintain the monochromatic theme.
- Finish with a glossy top coat.
Tips and Tricks for Successful Nail Art
To make your mix and match nail art experience as enjoyable and successful as possible, keep these tips in mind:
1. Start Simple
If you are new to nail art, begin with simple designs and gradually work your way up to more intricate combinations. This helps build your skills and confidence.
2. Use Quality Products
Invest in good-quality nail products. High-quality polishes provide better coverage, faster drying times, and longer-lasting wear.
3. Be Patient
Allow each layer of polish to dry before adding more colors or designs. This prevents smudging and ensures cleaner lines.
4. Experiment and Have Fun
Don’t be afraid to experiment with colors, shapes, and techniques. Mix and match freely, and remember that nail art should be a fun and creative process.
5. Practice
Practice makes perfect. The more you create nail art, the more comfortable and skilled you will become with different techniques.
6. Protect Your Nails
Always use a base coat to protect your natural nails and a top coat for a lasting finish. Regularly apply cuticle oil to keep them hydrated.
Troubleshooting Common Nail Art Challenges

Sometimes, nail art can present challenges. Here are solutions for common issues you might encounter during the process:
1. Smudging Designs
If you accidentally smudge your designs, allow them to dry fully before applying a top coat. If necessary, use a brush with nail polish remover to clean up smudges.
2. Bubbles in Polish
To avoid bubbles in your nail polish, roll the bottle between your palms instead of shaking it. Apply polish in thin coats and avoid fanning your nails while they dry.
3. Uneven Nail Surface
If you notice an uneven surface after application, use a buffer to smooth out the imperfections. Follow this with a layer of top coat to create a smooth finish.
4. Chipping Polish
To reduce chipping, ensure that you adequately cap the free edge of your nails with polish. Also, be cautious while engaging in activities that can stress your nails, like opening cans or using your nails as tools.
Caring for Your Nail Art
After you have created your stunning mix and match designs, it’s important to care for your nails to maintain their beauty. Here are some tips for nail care:
1. Keep Nails Hydrated
Use cuticle oil daily to prevent dryness. Healthy cuticles contribute to overall nail health and improve the appearance of your manicure.
2. Avoid Harsh Chemicals
Limit exposure to cleaning products and harsh chemicals, as they can damage your nails. Wear gloves while doing household chores.
3. Allow Breaks Between Manicures
Although nail art is exciting, it is essential to give your nails breaks between manicures. This allows them to recover and reduces the risk of damage.
4. Regular Maintenance
Schedule regular maintenance for your nails. Many salons offer touch-up services for gel or acrylic nails, allowing you to keep your designs looking fresh.
5. Eat a Balanced Diet
Nourishing your body with a balanced diet rich in vitamins and minerals can promote healthy nail growth. Foods high in biotin, zinc, and protein support good nail health.
Conclusion: Unleash Your Inner Artist
Mixing and matching nail art styles opens up a world of creative possibilities. By combining different colors, techniques, and designs, you can express your unique personality and showcase your artistic flair.
Feel free to experiment and try out various combinations; there are no limits to what you can create. Embrace the fun and whimsy of nail art, and let your creativity shine. With practice and an adventurous spirit, you can turn your nails into a canvas that reflects your style.
So gather your tools, find inspiration in the eclectic combinations, and let your imagination run wild as you dive into the exciting world of mix and match nail art.